From Manuals
The following image shows where the connectors, headers, and jumpers are located on the Bambino 200.
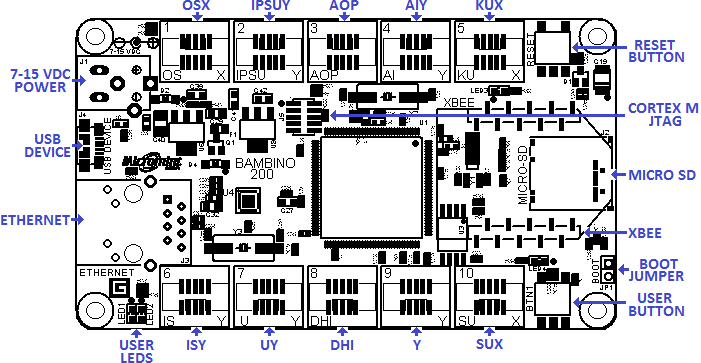
Bambino 200 User Interfaces, Connectors, and Jumpers
Power Supply
User Button and LEDs
The Bambino 200 comes standard with a user push button, a reset push button, and two user LEDs. The user push button is connected to GPIO0[7] with a 22k-ohm pull-up resistor connected to it. User LED1 (yellow) can be illuminated by clearing GPIO3[7] of the LPC4330. User LED2 (green) can be illuminated by clearing GPIO5[5].
USB Device
Boot Jumper
Socket 1 OSX
Table x.x: Gadgeteer Functions for Socket 1
| Socket
| MCU
| Gadgeteer Function
|
| Pin #
| Symbol
| O
| S
| X
|
| 1
| 3.3V
| 3.3V
| 3.3V
| 3.3V
|
| 2
| 5.0V
| 5.0V
| 5.0V
| 5.0V
|
| 3
| P4_5
| GPIO2[5]
| GPIO2[5]
| GPIO2[5]
|
| 4
| P5_0
| GPIO2[9]
| GPIO2[9]
| GPIO2[9]
|
| 5
| P4_4
| DAC
| GPIO2[4]
| GPIO2[4]
|
| 6
| P1_0
|
| SSP0_SSEL
|
|
| 7
| P1_2
|
| SSP0_MOSI
|
|
| 8
| P1_1
|
| SSP0_MISO
|
|
| 9
| P3_0
|
| SSP0_SCK
|
|
| 10
| GND
| GND
| GND
| GND
|
Socket 2 IPSUY
Table x.x: Gadgeteer Functions for Socket 2
| Socket
| MCU
| Gadgeteer Function
|
| Pin #
| Symbol
| I
| P
| S
| U
| Y
|
| 1
| 3.3V
| 3.3V
| 3.3V
| 3.3V
| 3.3V
| 3.3V
|
| 2
| 5.0V
| 5.0V
| 5.0V
| 5.0V
| 5.0V
| 5.0V
|
| 3
| P1_7
| GPIO1[0]
| GPIO1[0]
| GPIO1[0]
| GPIO1[0]
| GPIO1[0]
|
| 4
| P6_4
|
|
| GPIO3[3]
| U0_TXD
| GPIO3[3]
|
| 5
| P6_5
|
|
| GPIO3[4]
| U0_RXD
| GPIO3[4]
|
| 6
| P4_6
| GPIO2[6]
| GPIO2[6]
| SGPIO12
| GPIO2[6]
| GPIO2[6]
|
| 7
| P4_8
|
| SGPIO13
| SGPIO13
|
| GPIO5[12]
|
| 8
| P4_10
| SGPIO14
| SGPIO14
| SGPIO14
|
| GPIO5[13]
|
| 9
| P4_10
| SGPIO15
| SGPIO15
| SGPIO15
|
| GPIO5[14]
|
| 10
| GND
| GND
| GND
| GND
| GND
| GND
|
Socket 3 AOP
Table x.x: Gadgeteer Functions for Socket 3
| Socket
| MCU
| Gadgeteer Function
|
| Pin #
| Symbol
| A
| O
| P
|
| 1
| 3.3V
| 3.3V
| 3.3V
| 3.3V
|
| 2
| 5.0V
| 5.0V
| 5.0V
| 5.0V
|
| 3
| P4_3
| GPIO2[3]/ADC0_0
| GPIO2[3]
| GPIO2[3]
|
| 4
| P4_1
| GPIO2[1]/ADC0_1
| GPIO2[1]
|
|
| 5
| ADC0_0/ADC1_0
| ADC1_0
| DAC
|
|
| 6
| P4_2
| GPIO2[2]
|
| GPIO2[2]
|
| 7
| P4_0
|
|
| MCOA0
|
| 8
| P5_5
|
|
| MCOA1
|
| 9
| P5_7
|
|
| MCOA2
|
| 10
| GND
| GND
| GND
| GND
|
Socket 4 AIY
Table x.x: Gadgeteer Functions for Socket 4
| Socket
| MCU
| Gadgeteer Function
|
| Pin #
| Symbol
| A
| I
| Y
|
| 1
| 3.3V
| 3.3V
| 3.3V
| 3.3V
|
| 2
| 5.0V
| 5.0V
| 5.0V
| 5.0V
|
| 3
| P7_4
| GPIO3[12]/ADC0_4
| GPIO3[12]
| GPIO3[12]
|
| 4
| P7_5
| GPIO3[13]/ADC1_6
|
| GPIO3[13]
|
| 5
| P7_7
| ADC1_6
|
| GPIO3[15]
|
| 6
| P7_6
| GPIO3[14]
| GPIO3[14]
| GPIO3[14]
|
| 7
| P7_2
|
|
| GPIO3[10]
|
| 8
| P2_3
|
| I2C1_SDA
| GPIO5[3]
|
| 9
| P2_4
|
| I2C1_SCL
| GPIO5[4]
|
| 10
| GND
| GND
| GND
| GND
|
Socket 5 KUX
Table x.x: Gadgeteer Functions for Socket 5
| Socket
| MCU
| Gadgeteer Function
|
| Pin #
| Symbol
| K
| U
| X
|
| 1
| 3.3V
| 3.3V
| 3.3V
| 3.3V
|
| 2
| 5.0V
| 5.0V
| 5.0V
| 5.0V
|
| 3
| P5_1
| GPIO2[10]
| GPIO2[10]
| GPIO2[10]
|
| 4
| P5_6
| U1_TXD
| U1_TXD
| GPIO2[15]
|
| 5
| P1_14
| U1_RXD
| U1_RXD
| GPIO1[7]
|
| 6
| P5_2
| U1_RTS
| GPIO2[11]
|
|
| 7
| P5_4
| U1_CTS
|
|
|
| 8
|
|
|
|
|
| 9
|
|
|
|
|
| 10
| GND
| GND
| GND
| GND
|
Socket 6 ISY (200E Only)
Table x.x: Gadgeteer Functions for Socket 6
| Socket
| MCU
| Gadgeteer Function
|
| Pin #
| Symbol
| I
| S
| Y
|
| 1
| 3.3V
| 3.3V
| 3.3V
| 3.3V
|
| 2
| 5.0V
| 5.0V
| 5.0V
| 5.0V
|
| 3
| P6_1
| GPIO3[0]
| GPIO3[0]
| GPIO3[0]
|
| 4
| P1_8
|
| GPIO1[1]
| GPIO1[1]
|
| 5
| P5_3
|
| GPIO2[12]
| GPIO2[12]
|
| 6
| P9_6
| GPIO4[11]
| SGPIO8
| GPIO4[11]
|
| 7
| P6_6
|
| SGPIO5
| GPIO0[5]
|
| 8
| P6_7
| SGPIO6
| SGPIO6
| GPIO5[15]
|
| 9
| P6_8
| SGPIO7
| SGPIO7
| GPIO5[16]
|
| 10
| GND
| GND
| GND
| GND
|
Socket 7 UY (200E Only)
Table x.x: Gadgeteer Functions for Socket 7
| Socket
| MCU
| Gadgeteer Function
|
| Pin #
| Symbol
| U
| Y
|
| 1
| 3.3V
| 3.3V
| 3.3V
|
| 2
| 5.0V
| 5.0V
| 5.0V
|
| 3
| P2_1
| GPIO5[1]
| GPIO5[1]
|
| 4
| P9_5
| SGPIO3
| GPIO5[18]
|
| 5
| P6_3
| SGPIO4
| GPIO3[22]
|
| 6
| P6_2
| GPIO3[1]
| GPIO3[1]
|
| 7
| P2_2
|
| GPIO5[2]
|
| 8
| P6_10
|
| GPIO3[6]
|
| 9
| P7_3
|
| GPIO3[11]
|
| 10
| GND
| GND
| GND
|
Socket 8 DHI (200E Only)
Table x.x: Gadgeteer Functions for Socket 8
| Socket
| MCU
| Gadgeteer Function
|
| Pin #
| Symbol
| D
| H
| I
|
| 1
| 3.3V
| 3.3V
| 3.3V
| 3.3V
|
| 2
| 5.0V
| 5.0V
| 5.0V
| 5.0V
|
| 3
| P2_8
| GPIO5[7]
| GPIO5[7]
| GPIO5[7]
|
| 4
| USB1_DM
| USB1_DM
| USB1_DM
|
|
| 5
| USB1_DP
| USB1_DP
| USB1_DP
|
|
| 6
| P2_6
| GPIO5[6]
|
| GPIO5[6]
|
| 7
| P6_9
| GPIO3[5]
|
|
|
| 8
| I2C0_SDA
|
|
| I2C0_SDA
|
| 9
| I2C0_SCL
|
|
| I2C0_SCL
|
| 10
| GND
| GND
| GND
| GND
|
Socket 9 Y (200E Only)
Table x.x: Gadgeteer Functions for Socket 7
| Socket
| MCU
| Gadgeteer Function
|
| Pin #
| Symbol
| Y
|
| 1
| 3.3V
| 3.3V
|
| 2
| 5.0V
| 5.0V
|
| 3
| P2_9
| GPIO1[10]
|
| 4
| P3_2
| GPIO5[9]
|
| 5
| P3_1
| GPIO5[8]
|
| 6
| P2_12
| GPIO1[12]
|
| 7
| P2_13
| GPIO1[13]
|
| 8
| P7_1
| GPIO3[9]
|
| 9
| P7_0
| GPIO3[8]
|
| 10
| GND
| GND
|
Socket 10 SUX (200E Only)
Table x.x: Gadgeteer Functions for Socket 10
| Socket
| MCU
| Gadgeteer Function
|
| Pin #
| Symbol
| S
| U
| X
|
| 1
| 3.3V
| 3.3V
| 3.3V
| 3.3V
|
| 2
| 5.0V
| 5.0V
| 5.0V
| 5.0V
|
| 3
| P6_12
| GPIO2[8]
| GPIO2[8]
| GPIO2[8]
|
| 4
| P2_10
| GPIO0[14]
| U2_TXD
| GPIO0[14]
|
| 5
| P2_11
| GPIO1[11]
| U2_RXD
| GPIO1[11
|
| 6
| P1_5
| SSP1_SSEL
| GPIO1[8]
|
|
| 7
| P1_4
| SSP1_MOSI
|
|
|
| 8
| P1_3
| SSP1_MISO
|
|
|
| 9
| PF_4
| SSP1_SCK
|
|
|
| 10
| GND
| GND
| GND
| GND
|
10/100 Ethernet (200E Only)
The Bambino 200E is equipped with a fully-integrated 10/100 Mbps Ethernet port. The Media Access Control (MAC) is implemented in the LPC4330 and the Physical (PHY) layer is implemented with Micrel’s KSZ8031. J3 is the RJ-45 connector and it has integrated magnetics and LEDs completes the Ethernet sub-system. Please see the KSZ8031 data sheet for further information on the PHY and the LPC4330 User's Manual for the MAC.
MICRO SD (200E Only)
The microSD socket (J2) enables micro-secure-digital memory cards to be plugged into the Bambino 200E microcontroller board. The microSD card allows the user the ability of a standard removable media for transferring data to and from the Bambino 200E. The LPC4330 interfaces to the microSD card through the Secure Digital Input Output card interface.
XBEE (200E Only)
The XBEE socket adds wireless support to the Bambino 200E. Digi International has several different versions of XBEE modules with different wireless protocols in the same physical footprint. Zigbee and WiFi are a couple of protocols supported by Digi International's XBEE modules. Please see Digi International's website for further details.
Coin Battery (not populated)
Cortex M JTAG (not populated)
NEXT: Mechanical and Electrical Characteristics
PREVIOUS: Hardware
